Section 1: Getting Started

Installation
   node Install

   npx create-expo-app my-app --template blank

   go to my-app folder

   npm start

   ------

   Expo Go - app view in andriod phone

   -----

   Android Studio (preview Android app view in laptop)

   more action -> virtual device manager -> create device (include playstore template)

   ----

   Xcode (preview Ios app view in laptop only work is Mac)

   preference -> location -> comment line tools (select)

   -----

   npm start

   a - Andiod

   i - ios

   r - manual reload app
Basic (Create Goals App)
https://reactnative.dev/docs/components-and-apis
    style = {{
        margin: 16,
        borderWidth: 2,
        borderColor: 'red'
    }}
---------

<View style={styles.container}>

const styles = StyleSheet.create({
  container: {
    flex: 1,
    backgroundColor: '#fff',
    alignItems: 'center',
    justifyContent: 'center',
  },
});
Todo list with scrollView
import { StyleSheet, Text, View, TextInput, Button, ScrollView } from 'react-native';
import { useState } from 'react';

export default function App() {
  const [goalInput, setGoalInput] = useState('')
  const [goalsList, setGoalList] = useState([])

  function handleGoalInput(entertedText) {
    setGoalInput(entertedText);
  }

  function handleAddGoal () {
    setGoalList(prevList => [
        ...prevList,
        goalInput
      ])
    setGoalInput('');
  }

  return (
    <View style={styles.container}>
      <View style={styles.inputContainer}>
        <TextInput style={styles.input} placeholder="Type something" onChangeText={handleGoalInput} value={goalInput} />
        <Button title="Add Goal" onPress={handleAddGoal}/>
      </View>
      <View style={styles.listContainer}>
        <ScrollView >
            {goalsList.map((goal, index) => (<Text style={styles.listDsn} key={index}>{goal}</Text>)) }
        </ScrollView>
      </View>
    </View>
  );
}

const styles = StyleSheet.create({
  container: {
    flex: 1,
    backgroundColor: '#fff',
    alignItems: 'center',
    justifyContent: 'center',
  },
  listContainer:{
    flex:4,
    width:'100%',
    padding: 15
  },
  inputContainer: {
    flex:1,
    flexDirection: 'row',
    alignItems:'center',
  },
  input: {
    borderColor: "#ccc",
    borderBottomWidth: 1,
    width: '70%',
    marginRight: 15,
  },
  listDsn: {
    marginBottom: 100,
    fontSize: 16,
    color: '#333',
  },
});
Todo list with FlatList
import { StyleSheet, Text, View, TextInput, Button,  FlatList } from 'react-native';
import { useState } from 'react';

export default function App() {
  const [goalInput, setGoalInput] = useState('')
  const [goalsList, setGoalList] = useState([])

  function handleGoalInput(entertedText) {
    setGoalInput(entertedText);
  }

  function handleAddGoal () {
    setGoalList(prevList => [
        ...prevList,
        {id : Math.random().toString(), value: goalInput}
      ])
    // setGoalInput('');
  }

  return (
    <View style={styles.container}>
      <View style={styles.inputContainer}>
        <TextInput style={styles.input} placeholder="Type something" onChangeText={handleGoalInput} value={goalInput} />
        <Button title='Add Goal' onPress={handleAddGoal}/>
      </View>
      <View style={styles.listContainer}>
        <FlatList
          data={goalsList}
          renderItem={(itemData) => {
            return (
              <Text style={styles.listDsn}> {itemData.item.value} </Text>
            )
          }}
          keyExtractor={(item, index) => {
            return item.id
          }}
          alwaysBouncerVertical={false}
        />
      </View>
    </View>
  );
}

const styles = StyleSheet.create({
  container: {
    flex: 1,
    backgroundColor: '#fff',
    alignItems: 'center',
    justifyContent: 'center',
  },
  listContainer:{
    flex:4,
    width:'100%',
    padding: 15
  },
  inputContainer: {
    flex:1,
    flexDirection: 'row',
    alignItems:'center',
  },
  input: {
    borderColor: "#ccc",
    borderBottomWidth: 1,
    width: '70%',
    marginRight: 15,
  },
  listDsn: {
    marginBottom: 100,
    fontSize: 16,
    color: '#333',
  },
});
Todo list with FlatList, delete
import { StyleSheet, View, FlatList } from 'react-native';
import { useState } from 'react';

import GoalItem from './components/GoalItem'
import GoalInput from './components/GoalInput'


export default function App() {
  const [goalsList, setGoalList] = useState([])

  function handleGoalInput(input) {
    setGoalList(prevList => [
        ...prevList,
        {id : Math.random().toString(), value: input}
      ])
  }

  function handleDeleteGoal(id) {
    setGoalList(prevList => {
      return prevList.filter((goal) => goal.id !== id)
    })
  }

  return (
    <View style={styles.container}>
      <GoalInput onDataReceived={handleGoalInput}/>
      <View style={styles.listContainer}>
        <FlatList
          data={goalsList}
          renderItem={(itemData) => {
            return <GoalItem text={itemData.item} onDeleteItem={handleDeleteGoal}/>
          }}
          keyExtractor={(item, index) => {
            return item.id
          }}
          alwaysBouncerVertical={false}
          numColoumns={2}
        />
      </View>
    </View>
  );
}

const styles = StyleSheet.create({
  container: {
    flex: 1,
    backgroundColor: '#fff',
    alignItems: 'center',
    justifyContent: 'center',
  },
  listContainer:{
    flex:4,
    width:'100%',
    padding: 15
  },


});


--------------
import { Text, StyleSheet } from 'react-native';

function GoalItem({ text, onDeleteItem }) {
  return (
    <Text style={styles.listDsn} onPress={onDeleteItem.bind(this, text.id)}>{text.value} {text.id}</Text>
  );
}

export default GoalItem;

const styles = StyleSheet.create({
 listDsn: {
    marginBottom: 100,
    fontSize: 16,
    color: '#333',
  },
})

---------------
import {View, TextInput, Button, StyleSheet} from 'react-native'
import { useState } from 'react';


function GoalInput({onDataReceived}) {
  const [goalInput, setGoalInput] = useState('')


  function handleGoalInput(entertedText) {
    setGoalInput(entertedText);
  }

  function handleAddGoal () {
    onDataReceived(goalInput)
    // setGoalInput('');
  }

  return(
    <View style={styles.inputContainer}>
        <TextInput style={styles.input} placeholder="Type something" onChangeText={handleGoalInput} value={goalInput} />
        <Button title='Add Goal' onPress={handleAddGoal}/>
      </View>
    )

}
export default GoalInput;


const styles = StyleSheet.create({
  inputContainer: {
    flex:1,
    flexDirection: 'row',
    alignItems:'center',
  },
  input: {
    borderColor: "#ccc",
    borderBottomWidth: 1,
    width: '70%',
    marginRight: 15,
  },
})
Hover Effect
<Pressable
  android_ripple={{color: '#ddd'}}
  onPress={onDeleteItem.bind(this, text.id)}
  style={({pressed}) => pressed && styles.pressedItem}>
Image
  import { Image } from 'react-native';
<Image source={require('../asset/images/image.png')}>
Status bar
  import { StatusBar } from 'react-native';
<StatusBar style="light">
To do list app
Layout
Screens/GameStart.js
components/PrimaryButton.js, Title.js
constants/colors.js
Boxshadow in Css
        // Andoid
        elevation: 4,

        //iOS
        shadowColor: 'black',
        shadowOffset : {width: 0, height: 2},
        shadowRadius : 6,
        shadowOpacity : 0.25,
Input Text config
        <TextInput style={styles.NumberInput}
        maxLength={2}
        keyboardType='number-pad' //show number keyboard
        autoCapitalize="none"   // Capitalize
        autoCorrect={false}     // it's true for email validation like that
        />
Button Hover Animation
        <Pressable
       style={({pressed}) =>
        pressed                            // click color change for iOs
        ? [styles.btnInnercontainer, styles.pressed]
        : styles.btnInnercontainer
       }
       onPress={pressHandler}
       android_ripple={{color: '#640233'}}  // click color change for android
       >
Overall Code
        import { StyleSheet, Text, View, Pressable } from 'react-native';

export default function App({children}) {
  function pressHandler() {
    console.log("Pressed")
  }
  return (
    <View style={styles.btnOutercontainer}>
      <Pressable
       style={({pressed}) =>
        pressed                            // click color change for iOs
        ? [styles.btnInnercontainer, styles.pressed]
        : styles.btnInnercontainer
       }
       onPress={pressHandler}
       android_ripple={{color: '#640233'}}  // click color change for android
       >
      <Text style={styles.btnText}>{children}</Text>
      </Pressable>
    </View>
  );
}

const styles = StyleSheet.create({
  btnOutercontainer: {
    backgroundColor: 'orange',
    alignItems: 'center',
    justifyContent: 'center',
    borderRadius: 10,
    overflow:'hidden'
  },
  btnInnercontainer: {
    paddingVertical: 10,
    paddingHorizontal: 20,
    width: "100%",
  },
  pressed : {
    color: '#cccccc'
  },
  btnText: {
    color: 'white',
    textAlign: "center"
  }
});
Linear Gradient
        npm install -g expo-cli

        expo install expo-linear-gradient


        import {LinearGradient} from 'expo-linear-gradient'

        <LinearGradient
            colors={['#ff7e5f', '#feb47b']} // Gradient colors
            start={{ x: 0, y: 0 }} // Start position of the gradient
            end={{ x: 1, y: 1 }}   // End position of the gradient
            >
            <StartGameScreen />
        </LinearGradient>
Background Image (opacity) with gradient
        import { StyleSheet,  View, ImageBackground } from 'react-native';
        import {LinearGradient} from 'expo-linear-gradient'

        <LinearGradient
        colors={['#ff7e5f', '#feb47b']} // Gradient colors
        start={{ x: 0, y: 0 }} // Start position of the gradient
        end={{ x: 1, y: 1 }}   // End position of the gradient
        style={styles.rootScreen}
        >
        <ImageBackground
          source={require('./assets/images/background.jpg')}
          resizeMode="cover"
          style={styles.rootScreen}
          imageStyle={styles.backgroundImage}>
          <StatusBar style="light"/>
            <StartGameScreen />
        </ImageBackground>
      </LinearGradient>


        const styles = StyleSheet.create({
          rootScreen : {
            flex: 1,
          },
          backgroundImage: {
            opacity: 0.15
          }
        })
58. validation with alert
        const [enteredNumber, setEnterNumber] = useState('');

  function handleNumberInput (enteredText) {
    setEnterNumber(enteredText)
  }

  function resetInputHandler () {
    setEnterNumber('')
  }

  function confirmInputHandler () {
    const chosenNumber = parseInt(enteredNumber)

    if(isNaN(chosenNumber) || chosenNumber <= 0 || chosenNumber > 99){
      Alert.alert(
        'Invalid number',
        'Number has to be a number between 1 and 99',
        [{text: 'Okay', style:'destructive', onPress: resetInputHandler}]
      );
      return ;
    }

  }
Switching Screens Programmatically
        onPickNmber(enteredNumber)

        export default function App({children, onPickNmber}) {

        -----

        function pickedNumberHandler(pickedNumber) {
            setUserNumber(pickedNumber)
        }

        let screen = <StartGameScreen onPickNmber={pickedNumberHandler}/>
          if(userNumber) {
            screen = <GameScreen />
        }
62. Safeareaview
In React Native, SafeAreaView is a component that ensures content is rendered within the safe area boundaries of a device. This is especially useful for devices with notches, status bars, or home indicators
        import { StyleSheet,  View, ImageBackground, SafeAreaView } from 'react-native';

        <SafeAreaView style={styles.rootScreen}>
          <StatusBar style="light"/>
            {screen}
        </SafeAreaView>
Colors Gobally
        constants/colors.js

        const Colors = {
      primary500: '#73063c',
      primary800: '#640233'
    }

    export default Colors

    import Colors from '../constants/colors'

    borderBottomColor: Colors.primary500,
65. Displaying Random Numbers
        function generateRandomBetween (min, max, exclude) {
          const rndNum = Math.floor(Math.random() * (max - min)) + min;

          if (rndNum === exclude) {
            return generateRandomBetween(min, max, exclude)
          } else {
            return rndNum;
          }
        }

      const initialGuess = generateRandomBetween (1, 100, userNumber)
66. Adding Game Control Buttons ("+" & "-") to the App
        import { StyleSheet, Text, View, Alert } from 'react-native';
import {useState} from 'react'
import PrimaryButton from '../components/PrimaryButton'


function generateRandomBetween (min, max, exclude) {
  const rndNum = Math.floor(Math.random() * (max - min)) + min;

  if (rndNum === exclude) {
    return generateRandomBetween(min, max, exclude)
  } else {
    return rndNum;
  }
}

let minBoundary = 1;
let maxBoundary = 100

export default function App({userNumber}) {
  const initialGuess = generateRandomBetween (minBoundary, maxBoundary, userNumber)
  const [guessNum, setGuessNum] = useState(initialGuess)

  function nextGuessHandler(direction) {
    if(
        (direction === "lower" && guessNum < userNumber) ||
        (direction === "greater" && guessNum > userNumber)
      ) {
          Alert.alert("Don't lie!", 'you know that this is wrong...',
                      [{text:'Sorry', style: 'cancel'}])

        return ;
    }

    if(direction === "lower") {
      maxBoundary = guessNum
    } else {
      minBoundary = guessNum + 1
    }

    const newRndNumber = generateRandomBetween(minBoundary, maxBoundary, userNumber)
    setGuessNum(newRndNumber)
  }

  return (
    <View style={styles.container}>
      <Text>Opponents Guess</Text>
      <Text>{guessNum}</Text>
      <View style={styles.btnContainer}>
        <View style={styles.btnCol}>
          <PrimaryButton onPress={nextGuessHandler.bind(this, 'greater')}>+</PrimaryButton>
        </View>
        <View style={styles.btnCol}>
          <PrimaryButton onPress={nextGuessHandler.bind(this, 'lower')}>-</PrimaryButton>
        </View>
      </View>
    </View>
  );
}

const styles = StyleSheet.create({
  container: {
    flex: 1,
    alignItems: 'center',
    justifyContent: 'center',
  },
  btnContainer: {
    flexDirection: "row"
  },
  btnCol : {
    flex: 1,
    marginHorizontal : 10
  }
});
UseEffect
        export default function App({userNumber, onGameOver}) {
        useEffect(() => {
          if(parseInt(guessNum) === parseInt(userNumber)) {
            onGameOver()
          }

        }, [guessNum, userNumber, onGameOver ])
        ----

          const [gameOver, setGameOver] = useState(false)
          function handleGameOverScreen() {
            setGameOver(true)
          }

          let screen = <StartGameScreen onPickNmber={pickedNumberHandler}/>
          if(userNumber) {
            screen = <GameScreen userNumber={userNumber} onGameOver={handleGameOverScreen}/>
          }
          if (gameOver && userNumber) {
            screen = <GameOverScreen/>
          }
Cascading Styles
        export default function App({children, onPress, style}) {
          <Text style={[styles.btnText, style]}>{children}</Text>
          ----
          <PrimaryButton style={styles.btnBlkCl} onPress={resetInputHandler}>reset</PrimaryButton>
Icons
        import {Ionicons} from '@expo/vector-icons';
        <Ionicons name="add-circle-outline" size={24} color="black" />
Use Font
        npm install expo-font
        npm install expo-app-loading

        /assets/fonts/Raleway.ttf

        import { useFonts } from 'expo-font';
        import AppLoading from 'expo-app-loading'

        const [fontsLoaded] = useFonts({
          'Raleway': require('./assets/fonts/Raleway.ttf'),
        });

        if (!fontsLoaded) {
          return <AppLoading />;
        }

        rootScreen : {
          flex: 1,
          fontFamily : 'Raleway'
        },
Value pass
        //GameOverScreen.js
        export default function App({roundNumber, userNumber, onStartGame})

      <Text style={styles.description}>Your phone needed
        <Text style={styles.highlight}>{roundNumber}</Text> rounds to guess the number
        <Text style={styles.highlight}>{userNumber}</Text>
      </Text>
      <View>
          <PrimaryButton onPress={onStartGame}>Start New Game </PrimaryButton>
      </View>

      //App.js
      const [roundNumber, setRoundNumber] = useState(0)

      function handleStartNewGame() {
        setUserNumber(null);
        setRoundNumber(0)
      }

      if (gameOver && userNumber) {
        screen = <GameOverScreen userNumber={userNumber} roundNumber={roundNumber} onStartGame={handleStartNewGame} />
      }

      //GameScreen.js
      useEffect(() => {
        minBoundary =1;
        maxBoundary = 100;
      }, [])
        //GameScreen.js
        const [guessNumberList, setGuessNumberList] = useState([])

        function nextGuessHandler(direction) {
          if(
              (direction === "lower" && guessNum < userNumber) ||
              (direction === "greater" && guessNum > userNumber)
            ) {
                Alert.alert("Don't lie!", 'you know that this is wrong...',
                            [{text:'Sorry', style: 'cancel'}])

              return ;
          }

          if(direction === "lower") {
            maxBoundary = guessNum
          } else {
            minBoundary = guessNum + 1
          }

          const newRndNumber = generateRandomBetween(minBoundary, maxBoundary, userNumber)
          setGuessNum(newRndNumber)
          setGuessNumberList(prevData => [...prevData, newRndNumber])
        }

        <FlatList data={guessNumberList}
        renderItem={(itemData) => {
          return (
            <Text>{itemData.item}</Text>
          )
        }}
        keyExtractor={(item, index) => {
          return index
        }}
        alwaysBouncerVertical={false}
      />


      onGameOver(guessNumberList.length)

      //App.js
      function handleGameOverScreen(number) {
        setGameOver(true)
        setRoundNumber(number)
      }
Game app
Dimensions API
Dynamic change value based of widow size
        import { Dimensions  } from 'react-native';

        const deviceHeight = Dimensions.get('window').height

        padddingTop : deviceHeight < 380 ? 12 : 24
Screen Orientation Problems(Auto rotate)
        //App.json
        "orientation": "auto",
Setting size dynamically
        import { useWindowDimensions  } from 'react-native';

        const {width, height} = useWindowDimensions()

        const marginTopDistance = height < 500 ? 30 : 70

        style={[styles.rootScreen, {marginTop: marginTopDistance}]}
86. Managing Screen Content with KeyboardAvoidingView
        import { ScrollView, KeyboardAvoidingView } from 'react-native';


        <ScrollView style={styles.screen}>
        <KeyboardAvoidingView style={styles.screen} behavior="position">
         ...Code
        </KeyboardAvoidingView>
        </ScrollView>
Improving the Landscape Mode UI
        import { useWindowDimensions  } from 'react-native';

        const {width, height} = useWindowDimensions()

        let content = <>
          <Text>{guessNum}</Text>
        </>

        if(width > 500) {
          content = <>
           <Text>{guessNum2}</Text>
          </>
        }

        {content}
ImageSize with useWindowDimensions
        import { useWindowDimensions  } from 'react-native';

        const {width, height} = useWindowDimensions()

        let imageSize = 300;

        if(width < 380) {imageSize = 150}
        if(height < 400) {imageSize = 80}

        const imageStyle = {
          width : imageSize,
          height : imageSize,
          borderRadius : imageSize / 2
        }

        style={[styles.imageContainer, imageStyle]}
Writing Platform-specific code with the Platform API
        // method 1
        borderWidth : Platform.Os === 'android' ? 2 : 0

        // method 2
        borderWidth : Platform.select({ios:0, android:2})

        // method 3
        Title.android.js
        borderWidth : 2

        Title.ios.js
        borderWidth : 0

        import Title form './../Title'
Navigation Package
        npm install @react-navigation/native
        expo install react-native-screens react-native-safe-area-context
        expo install @react-navigation/native-stack

        // App.js
        import {NavigationContainer} from '@react-navigation/native'
        import { createNativeStackNavigator } from '@react-navigation/native-stack'

        const Stack = createNativeStackNavigator();
        <NavigationContainer>
          <Stack.Navigator
          initialRouteName="MealsCategories" // Set initial screen
          >
            <Stack.Screen name="MealsCategories" component={CategoriesScreen} />
          </Stack.Navigator>
        </NavigationContainer>
Implementing Navigation Between Two Screes
        //App.js
        const Stack = createNativeStackNavigator();
        <NavigationContainer>
          <Stack.Navigator>
            <Stack.Screen name="MealsCategories" component={CategoriesScreen} />
            <Stack.Screen name="MealsOverViewScreen" component={MealsOverviewScreen} />
          </Stack.Navigator>
        </NavigationContainer>

        //MealsOverviewScreen.js
        import { StyleSheet, FlatList, View } from 'react-native';
        import MealsGridTile from '../components/MealsGridTile';

        import {CATEGORIES, MEALS} from '../data/dummy-data'

        function renderCategoryItem (itemData) {
          const item = itemData.item
          const mealsProps = {
            title : item.title,
            color : item.color,
            imageUrl : item.imageUrl
          }
          return <MealsGridTile {...mealsProps}/>
        }


        export default function MealsOverviewScreen() {
          return (
            <View>
              //<Image source={{url: imageUrl}} />
              <FlatList
                data={MEALS}
                keyExtracter={(item) => item.id}
                renderItem={renderCategoryItem}
                numColumns={2}
              />
            </View>
          );
        }


        //CategoriesScreen.js
        export default function CategoriesScreen({navigation}) {
            function renderCategoryItem (itemData) {
            function pressHandler() {
              navigation.navigate('MealsOverViewScreen');
            }
            return <CategoryGridTile
              title={itemData.item.title}
              color={itemData.item.color}
              onPress={pressHandler}
              />
            }

          return (
            <FlatList
              data={CATEGORIES}
              keyExtractor={(item) => item.id}
              renderItem={renderCategoryItem}
              numColumns={2}
              />
          );
        }
Pass Id through route
        //MealsOverviewScreen.js
        export default function CategoriesScreen({navigation}) {
        function pressHandler() {
          navigation.navigate('MealsOverViewScreen', {
            categoryId : itemData.item.id
          });
        }


        //CategoriesScreen.js
        export default function MealsOverviewScreen({route}) {
        const CatId = route.params.categoryId
filter categoryId based
        CatId = C1,


        new Meal(
        'm1',
        ['c1', 'c2'], // CategoryIds
        'Spaghetti with Tomato Sauce',


        //CategoriesScreen.js
        export default function MealsOverviewScreen({route}) {
        const CatId = route.params.categoryId
        const displayedMeals = MEALS.filter((mealItem) => {
          return mealItem.categoryIds.indexOf(CatId) >= 0;
        })
Pass Id and filter from Data
        export default function MealsGridTile() {
          const navigation = useNavigation()
          function handleMealDetailView() {
            navigation.navigate('MealDetailScreen', {
              mealId : itemData.item.id
            })
          }

          ------

          export default function MealsOverviewScreen({route, navigation}) {
          const mealId = route.params.mealId
          const selectedMeal = MEALS.find((meal) => meal.id === mealId)

          return (
            <View>
              <Text>{selectedMeal.title} ({mealId})</Text>
            </View>
          );
        }
Styling Screen Headers and backgrounds, navigation title dynamically
      <NavigationContainer>
        <Stack.Navigator
          screenOptions={{
            headerStyle: { backgroundColor: '#4a148c' }, // Custom header background color
            headerTintColor: 'white', // Tint color for back button and title
            contentStyle: { backgroundColor: '#fedeff' }, // Background color for screen
          }}
        >
          <Stack.Screen
            name="MealsCategories"
            component={CategoriesScreen}
            options={{ title: 'Meal Categories' }} // Custom title
          />
          <Stack.Screen
            name="MealsOverViewScreen"
            component={MealsOverviewScreen}
            options={{ title: 'Meals Overview' }}
          />
        </Stack.Navigator>
      </NavigationContainer>
navigation title dynamically
Option 1
        <Stack.Screen
            name="MealsOverviewScreen"
            component={MealsOverviewScreen}
            options={({ route }) => ({
              title: route.params.categoryTitle, // Dynamic title from params
            })}
          />


          navigation.navigate('MealsOverviewScreen', { categoryTitle: 'Italian Cuisine' });
Option 2
        navigation.navigate('MealsOverviewScreen', { categoryId : itemData.item.id });


        ----
        export default function MealsOverviewScreen({route, navigation}) {
        const CatId = route.params.categoryId

        useLayoutEffect(() => { // may use UseEffect
          const categoryTitle = CATEGORIES.find(category => category.id === CatId).title
          navigation.setOptions({
            title: categoryTitle, // Dynamically update the header title
          });
        }, [navigation, CatId]);
header buttons
      import { useLayoutEffect } from 'react';
      import { Ionicons } from '@expo/vector-icons'; // Import Ionicons for the star icon

      export default function MealsOverviewScreen({route, navigation}) {

        const mealId = route.params.mealId

        useLayoutEffect(() => {
        navigation.setOptions({
          title: selectedMeal.title || 'Meals',
          headerRight: () => (
            <Pressable
              onPress={() => alert('Added to favorites!')}
              style={({ pressed }) => [{ opacity: pressed ? 0.5 : 1 }]}
            >
              <Ionicons name="star" size={24} color="yellow" />
            </Pressable>
          ),
        });
      }, [navigation, selectedMeal]);

        const selectedMeal = MEALS.find((meal) => meal.id === mealId)

        return (
          <View>
            <Text>{selectedMeal.title} ({mealId})</Text>
          </View>
        );
      }
Drawer Nav bar
npm install react-native-reanimate d@1 --save --save-exact
        npm install @react-navigation/drawer

        expo install react-native-gesture-handler react-native-reanimated

        npm install react-native-reanimated@1 --save --save-exact


import { StatusBar } from 'expo-status-bar';
import CategoriesScreen from './screens/CategoriesScreen';
import MealsOverviewScreen from './screens/MealsOverviewScreen';
import MealDetailScreen from './screens/MealDetailScreen';

import { StyleSheet, Text, View } from 'react-native';
import { NavigationContainer } from '@react-navigation/native';
import { createDrawerNavigator } from '@react-navigation/drawer';
import { Ionicons } from '@expo/vector-icons';  // Import icons

const Drawer = createDrawerNavigator();


export default function App() {
  return (
    <>
      <StatusBar style="light" />
      <NavigationContainer>
        <Drawer.Navigator
          screenOptions={{
            headerStyle: { backgroundColor: '#4a148c' },
            headerTintColor: 'white',
            contentStyle: { backgroundColor: '#fedeff' },
            drawerStyle: {
              backgroundColor: '#c6cbef', // background color
              width: 270,
            },
            drawerActiveTintColor: '#e91e63', // Color for active item
            drawerInactiveTintColor: 'black', // Color for inactive items
            drawerActiveBackgroundColor: '#ddd', // Active background color
            drawerLabelStyle: {
              fontSize: 16,
              fontWeight: 'bold',
            },
          }}
        >
          <Drawer.Screen
            name="MealsCategories"
            component={CategoriesScreen}
            options={{
              title: 'Meal Categories',
              drawerIcon: ({ color, size }) => (
                <Ionicons name="home" size={size} color={color} /> // Icon for this screen
              ),
            }}
          />
          <Drawer.Screen
            name="MealsOverviewScreen"
            component={MealsOverviewScreen}
            options={{
              title: 'Meals Overview',
              drawerIcon: ({ color, size }) => (
                <Ionicons name="star" size={size} color={color} /> // Icon for this screen
              ),
            }}
          />
          <Drawer.Screen
            name="MealDetailScreen"
            component={MealDetailScreen}
            options={{
              title: 'Meal Detail',
              drawerIcon: ({ color, size }) => (
                <Ionicons name="admin" size={size} color={color} /> // Icon for this screen
              ),
            }}
          />
        </Drawer.Navigator>
      </NavigationContainer>
    </>
  );
}

const styles = StyleSheet.create({
  container: {
    flex: 1,
    alignItems: 'center',
    justifyContent: 'center',
  },
});
Button to toggle Drawer Nav bar
        const CategoriesScreen = ({ navigation }) => {

          function handleNavbar () {
            navigation.toggleDrawer()
          }
Bottom tab Nav bar
        npm install @react-navigation/bottom-tabs

        import React from 'react';
import { createBottomTabNavigator } from '@react-navigation/bottom-tabs';
import { NavigationContainer } from '@react-navigation/native';
import { View, Text } from 'react-native';
import Icon from 'react-native-vector-icons/Ionicons';

// Dummy Screens
const HomeScreen = () => (
  <View style={{ flex: 1, justifyContent: 'center', alignItems: 'center' }}>
    <Text>Home Screen</Text>
  </View>
);

const SettingsScreen = () => (
  <View style={{ flex: 1, justifyContent: 'center', alignItems: 'center' }}>
    <Text>Settings Screen</Text>
  </View>
);

// Create Tab Navigator
const Tab = createBottomTabNavigator();

const App = () => {
  return (
    <NavigationContainer>
      <Tab.Navigator
        screenOptions={({ route }) => ({
          tabBarIcon: ({ color, size }) => {
            let iconName;
            if (route.name === 'Home') {
              iconName = 'home-outline';
            } else if (route.name === 'Settings') {
              iconName = 'settings-outline';
            }
            return <Icon name={iconName} size={size} color={color} />;
          },
          tabBarActiveTintColor: 'tomato',
          tabBarInactiveTintColor: 'gray',
          headerShown: false,
        })}
      >
        <Tab.Screen name="Home" component={HomeScreen} />
        <Tab.Screen name="Settings" component={SettingsScreen} />
      </Tab.Navigator>
    </NavigationContainer>
  );
};

export default App;
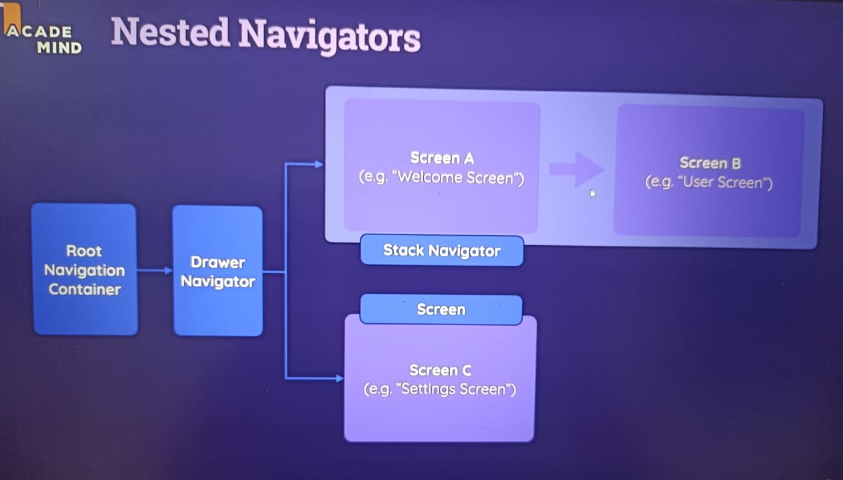
Nested Nav
import { StatusBar } from 'expo-status-bar';
import { StyleSheet, Button } from 'react-native';
import { NavigationContainer } from '@react-navigation/native';
import { createNativeStackNavigator } from '@react-navigation/native-stack';
import { createDrawerNavigator } from '@react-navigation/drawer';
import { Ionicons } from '@expo/vector-icons';

import CategoriesScreen from './screens/CategoriesScreen'
import MealsOverviewScreen from './screens/MealsOverviewScreen'
import MealDetailScreen from './screens/MealDetailScreen'
import FavoritesScreen from './screens/FavoritesScreen'

const Stack = createNativeStackNavigator();
const Drawer = createDrawerNavigator();

function DrawerNavigator() {
  return (
    <Drawer.Navigator
      screenOptions={{
        headerStyle: { backgroundColor: '#351401' },
        headerTintColor: 'white',
        sceneContainerStyle: { backgroundColor: '#3f2f25' },
        drawerContentStyle: { backgroundColor: '#351401' },
        drawerInactiveTintColor: 'white',
        drawerActiveTintColor: '#351401',
        drawerActiveBackgroundColor: '#e4baa1',
      }}
    >
      <Drawer.Screen
        name="Categories"
        component={CategoriesScreen}
        options={{
          title: 'All Categories',
          drawerIcon: ({ color, size }) => (
            <Ionicons name="list" color={color} size={size} />
          ),
        }}
      />
      <Drawer.Screen
        name="Favorites"
        component={FavoritesScreen}
        options={{
          drawerIcon: ({ color, size }) => (
            <Ionicons name="star" color={color} size={size} />
          ),
        }}
      />
    </Drawer.Navigator>
  );
}

export default function App() {
  return (
    <>
      <StatusBar style="light" />
      <NavigationContainer>
        <Stack.Navigator
          screenOptions={{
            headerStyle: { backgroundColor: '#351401' },
            headerTintColor: 'white',
            contentStyle: { backgroundColor: '#3f2f25' },
          }}
        >
          <Stack.Screen
            name="Drawer"
            component={DrawerNavigator}
            options={{
              headerShown: false,
            }}
          />
          <Stack.Screen name="MealsOverviewScreen" component={MealsOverviewScreen} />

          <Stack.Screen
            name="MealDetailScreen"
            component={MealDetailScreen}
            options={{
              title: 'About the Meal',
            }}
          />
        </Stack.Navigator>
      </NavigationContainer>
    </>
  );
}

const styles = StyleSheet.create({
  container: {},
});
Context API
        import { createContext,useState,useLayoutEffect  } from 'react';

export const FavoritiesContext = createContext({
  ids: [],
  addFavorite: (id) => {},
  removeFavorite: (id) => {}
})

function FavoritiesContextProvider ({children}) {

  const [favoriteMealIds, setFavoriteMealIds] = useState([]);


  function addFavorite(id) {
    if (!favoriteMealIds.includes(id)) {
      setFavoriteMealIds((currentFavIds) => [...currentFavIds, id])
    } else {
      setFavoriteMealIds((currentFavIds) =>
        currentFavIds.filter((mealId) => mealId !== id)
      )

    }
  }
  function removeFavorite(id) {
    setFavoriteMealIds((currentFavIds) =>
      currentFavIds.filter((mealId) => mealId !== id)
    )

  }


  useLayoutEffect(()=>{
    console.log("favoriteMealIds",favoriteMealIds)
  }, [favoriteMealIds])

  const value = {
    ids: favoriteMealIds,
    addFavorite: addFavorite,
    removeFavorite: removeFavorite
  }

  return <FavoritiesContext.Provider value={value}>{children}</FavoritiesContext.Provider>
}

export default FavoritiesContextProvider

---
App.js
import FavoritiesContextProvider from './store/context/favorities-context'
export default function App() {
  return (
    <>
      <StatusBar style="light" />
      <FavoritiesContextProvider>
        <NavigationContainer>
        </NavigationContainer>
      </FavoritiesContextProvider>
    </>
    )}
----
import {FavoritiesContext} from '../store/context/favorities-context'

export default function MealsOverviewScreen({route, navigation}) {

  const favoriteMealsCtx = useContext(FavoritiesContext);

// if (!favoriteMealsCtx) {
//   console.error('FavoritesContext is undefined! Make sure you wrapped the component inside FavoritesContextProvider.');
// }

  const mealId = route.params.mealId

  const selectedMeal = MEALS.find((meal) => meal.id === mealId)

  const mealIsfavorite = favoriteMealsCtx.ids.includes(mealId)

  function changeFavoriesStatusHandler() {
    console.log("mealId", mealId)
    if (mealIsfavorite) {
      favoriteMealsCtx.removeFavorite(mealId);
    } else {
      favoriteMealsCtx.addFavorite(mealId);
    }
  }


  useLayoutEffect(() => {
  navigation.setOptions({
    title: selectedMeal.title || 'Meals',
    headerRight: () => (
      <Pressable
        onPress={changeFavoriesStatusHandler}
        style={({ pressed }) => [{ opacity: pressed ? 0.5 : 1 }, styles.paddingbtn]}
      >
        <Ionicons name={mealIsfavorite ? 'star' : 'star-outline'} size={24} color="yellow" />
      </Pressable>
    ),
  });
}, [navigation, selectedMeal, mealIsfavorite, changeFavoriesStatusHandler]);


  return (
    <View>
      <Text>{selectedMeal.title} ({mealId})</Text>
      <Pressable
        onPress={changeFavoriesStatusHandler}

        style={({ pressed }) => [{ opacity: pressed ? 0.5 : 1 }, styles.paddingbtn]}
      >
        <Ionicons name={mealIsfavorite ? 'star' : 'star-outline'} size={24} color="yellow" />
      </Pressable>
    </View>
  );
}